When Shopify orders need to flow into Acumatica ERP for fulfillment and accounting, the Acumatica-Shopify connector handles the synchronization. Orders from your Shopify store become sales orders in Acumatica, complete with customer data, line items, and payment information.

This guide co

vers how to configure the connector for sales order import, including payment processing, customer handling, and the settings that control how orders sync between systems.

Minimal Configuration Requirements

Before orders can import from Shopify, you need to activate entities and configure basic settings.

Entities to Activate

On the Shopify Stores form (BC201010), activate these entities for synchronization:

  • Sales Order: Required for order import
  • Customer: Required for customer creation and matching

Required Settings

Configure minimum settings for each area:

Customer Settings:

  • Default customer class for new customers
  • Customer numbering sequence
  • Update behavior for existing customers

Stock Item and Non-Stock Item Settings:

  • Default item class
  • How to handle items not found in Acumatica

Sales Order Settings:

  • Branch: The Acumatica branch to assign orders
  • Order Type for Import: The sales order type to create (typically SO for standard orders)
  • Refund Amount Item: The non-stock item to use for refund adjustments

Optional: Shipping Method Mapping

Map Shopify shipping options to Acumatica ship via codes. This ensures shipping methods translate correctly when orders import.

How Order Synchronization Works

Understanding the sync process helps you configure and troubleshoot effectively.

What Happens During Sync

When orders import from Shopify, the connector:

  1. Creates a sales order on the Sales Orders form (SO301000)
    1. Archived orders in Shopify are filtered out (not imported)
  2. Searches for products by SKU
    1. Matches stock items and non-stock items in Acumatica
    2. Products must already exist in Acumatica or be synchronized first
  3. Searches for the customer
    1. Matches existing customers or creates new ones
    2. Updates customer data based on your configuration
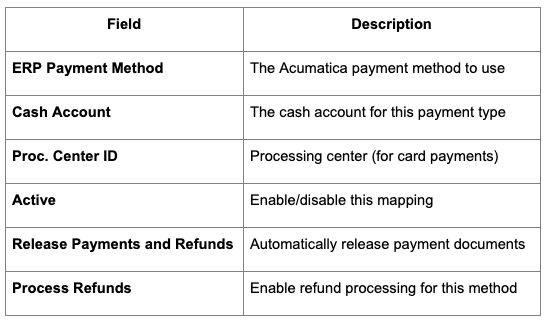
  4. Creates a prepayment document
    1. Payment records on the Payments and Applications form (AR302000)
    2. Requires payment method mapping (unmapped methods filter out payment records)

Product Matching

The connector matches Shopify line items to Acumatica items by SKU. Before orders can sync successfully:

  • Ensure products exist in Acumatica with matching SKUs
  • Run product synchronization first, or create items manually
  • Configure how to handle unmatched items (error vs. skip)

For product synchronization details, see How to Map Acumatica Stock Items to Shopify Products.

Customer Matching

The connector searches for existing customers based on email or other identifiers:

  • Existing customer found: Order assigns to that customer (with optional data updates)
  • No match found: New customer created with order information
  • Guest checkout: New customer created or assigned to a default guest customer

Configuring Payment Processing

Payment handling depends on whether you use integrated card processing.

Basic Payment Import

Without integrated card processing, payments import as prepayment records:

  • Payment method mapping determines the cash account
  • Payments appear on the Payments and Applications form (AR302000)
  • You can release payments manually or automatically

Integrated Card Processing

For full card-processing capabilities (authorization, capture, voiding, refunds), enable integrated processing.

Prerequisites

Enable the Integrated Card Processing feature on the Enable/Disable Features form (CS100000).

Step 1: Configure Shopify Payments

In your Shopify store, ensure Shopify Payments is set up and active.

Step 2: Enable Processing in Acumatica

On the Accounts Receivable Preferences form (AR101000):

  • Select the Enable Integrated CC Processing check box

Step 3: Configure the Processing Center

On the Processing Centers form (CA205000):

  • Create a processing center for Shopify
  • Configure connection settings for the Shopify payment gateway

Step 4: Configure Card Payment Method

On the Payment Methods form (CA204000):

  • Create or configure a card-based payment method
  • Link it to the Shopify processing center

Step 5: Map Payment Method

On the Shopify Stores form (BC201010), map the payment method (covered in the next section).

Payment Method Mapping

Payment methods must be mapped for payments to import correctly.

Mapping Location

Configure payment mappings on the Payment Settings tab of the Shopify Stores form (BC201010).

Required Mapping Fields

For each Shopify payment method, configure:

Shopify Payments Mapping

For Shopify Payments specifically, map:

  • Shopify Payments → Your card payment method
  • Include the processing center ID
  • Enable the Active check box
  • Configure release and refund settings based on your workflow

Unmapped Payment Methods

If a payment method isn't mapped or the mapping is inactive:

  • The payment record imports with a "Filtered" status
  • The sales order still creates, but payment isn't linked
  • You'll need to handle the payment manually

Mapping Shopify Payments Fees

Shopify Payments deducts fees from your payouts. To track these fees in Acumatica:

Step 1: Create Entry Types

On the Entry Types form (CA203000), create entry types for Shopify fees:

  • Transaction fees
  • Refund fees (if applicable)
  • Any other fee categories you want to track

Step 2: Add Entry Types to Cash Account

Add the entry types to the cash account specified in your Shopify Payments mapping. This allows the fees to post correctly.

Step 3: Map Fees in Connector

On the Shopify Stores form (BC201010), locate the Shopify Fees table:

  • Map each Shopify fee type to the corresponding entry type
  • This allows fees to import as cash account adjustments

Properly mapping fees ensures your cash accounts reconcile with actual Shopify payouts.

Order Type Configuration

The order type determines how sales orders behave in Acumatica.

Choosing an Order Type

Select an order type that matches your fulfillment workflow:

  • SO (Sales Order): Standard order type for most scenarios
  • Custom types: If you've created specialized order types for ecommerce

Order Type Settings

Ensure your chosen order type supports:

  • The operations you need (invoicing, shipping)
  • Prepayment and payment capture workflows
  • Your inventory and fulfillment requirements

Customer Configuration

Control how customers sync from Shopify orders.

New Customer Creation

When orders come from new customers:

  • Customer class assignment (determines default settings)
  • Numbering sequence for customer IDs
  • Required fields populated from order data

Existing Customer Updates

For orders from known customers:

  • Choose whether to update customer data from orders
  • Control which fields can update (address, phone, etc.)
  • Prevent overwrites of manually maintained data if needed

B2B Customer Handling

For B2B orders from Shopify:

  • Company and location data syncs
  • Payment terms apply from customer settings
  • Buyers associate with parent companies

For B2B configuration, see How to Configure Real-Time Bi-Directional Data Sync Between Acumatica and Shopify.

Common Configuration Scenarios

Scenario: Standard Retail Orders

For typical DTC orders:

  1. Activate Sales Order and Customer entities
  2. Set order type to SO
  3. Map payment methods to cash accounts
  4. Enable automatic payment release
  5. Configure shipping method mappings

Scenario: B2B Orders with Payment Terms

For wholesale orders with Net 30/60:

  1. Configure as above
  2. Ensure customer terms apply to sales orders
  3. Payment may not import (terms-based rather than prepaid)
  4. Invoicing follows your standard AR process

Scenario: Multiple Shopify Stores

If you have separate retail and wholesale Shopify stores:

  1. Create separate store configurations in Acumatica
  2. Each store can have different order types, branches, or settings
  3. Map payment methods per store as needed

Synchronization Process

After configuration, run synchronization to import orders.

Prepare Data

On the Prepare Data form (BC501000):

  1. Select the Sales Order entity
  2. Choose the date range or order criteria
  3. Run the prepare process

This stages orders for import, identifying what needs to sync.

Process Data

On the Process Data form (BC501500):

  1. Review prepared records
  2. Check for any errors or warnings
  3. Process the synchronization

Orders create in Acumatica based on your configuration.

Automation Options

Synchronization can run:

  • Manually: On-demand through forms
  • Scheduled: Automated at defined intervals
  • Real-time: Triggered by webhooks (if configured)

For initial setup, run manual syncs to verify configuration before enabling automation.

Troubleshooting Order Import

Orders Not Importing

Check:

  • Sales Order entity is activated
  • Order meets filter criteria (not archived)
  • No sync errors in process results

Products Not Found

Check:

  • SKUs match between Shopify and Acumatica
  • Products exist in Acumatica
  • Stock/non-stock item sync completed

Payments Filtered

Check:

  • Payment method mapping exists and is active
  • Cash account is configured
  • Processing center ID set (for card payments)

Customer Creation Fails

Check:

  • Required customer fields available from order
  • Customer class configured
  • Numbering sequence available

Post-Sync Workflow

After orders import to Acumatica:

Review Orders

  • Check the Sales Orders form (SO301000) for imported orders
  • Verify customer, items, and amounts are correct
  • Review any orders with warnings

Release Payments

If not set to auto-release:

  • Review prepayment documents
  • Release payments to apply them

Fulfill Orders

  • Process orders through your standard fulfillment workflow
  • Fulfillment syncs back to Shopify (if entity activated)
  • Tracking information updates in Shopify

For broader connector setup, see How to Set Up the Acumatica-Shopify Connector (Complete Guide).

Best Practices

Test Before Go-Live

  • Use a test Shopify store or sandbox
  • Process sample orders through the full workflow
  • Verify payments, customers, and items handle correctly

Monitor Initial Orders

  • Watch the first production orders closely
  • Check for mapping issues or unexpected behavior
  • Adjust configuration based on real order patterns

Maintain SKU Consistency

  • Keep SKUs synchronized between systems
  • Update mappings when adding new products
  • Audit periodically for mismatches

Document Your Configuration

  • Record payment method mappings
  • Note any custom settings or exceptions
  • Keep configuration accessible for troubleshooting

For general ERP integration guidance, see Shopify ERP Integration - A Guide.

Configuring sales order creation from Shopify orders connects your ecommerce channel to Acumatica's order management and fulfillment capabilities. Take time to configure payment mappings correctly, ensure products sync before orders, and test thoroughly before processing live orders.