How to Map Business Central Items to Shopify Products: Complete Field Mapping Guide
Mapping items from Microsoft Dynamics 365 Business Central to Shopify products requires understanding how fields sync between systems. This guide provides clear mapping tables and setup instructions for manufacturers and B2B businesses integrating Business Central with Shopify.
Understanding the Sync Direction
Business Central can sync items to Shopify in three ways:
To Shopify: Export products from Business Central to your Shopify store. Best for manufacturers using Business Central as source of truth.
From Shopify: Import products from Shopify into Business Central. Useful for migrating existing Shopify catalogs or when Shopify is the product master.
Blank (default): Products only imported when orders come from Shopify. Manual control over product creation.
Set this in Business Central: Shopify Shop > Sync Item field
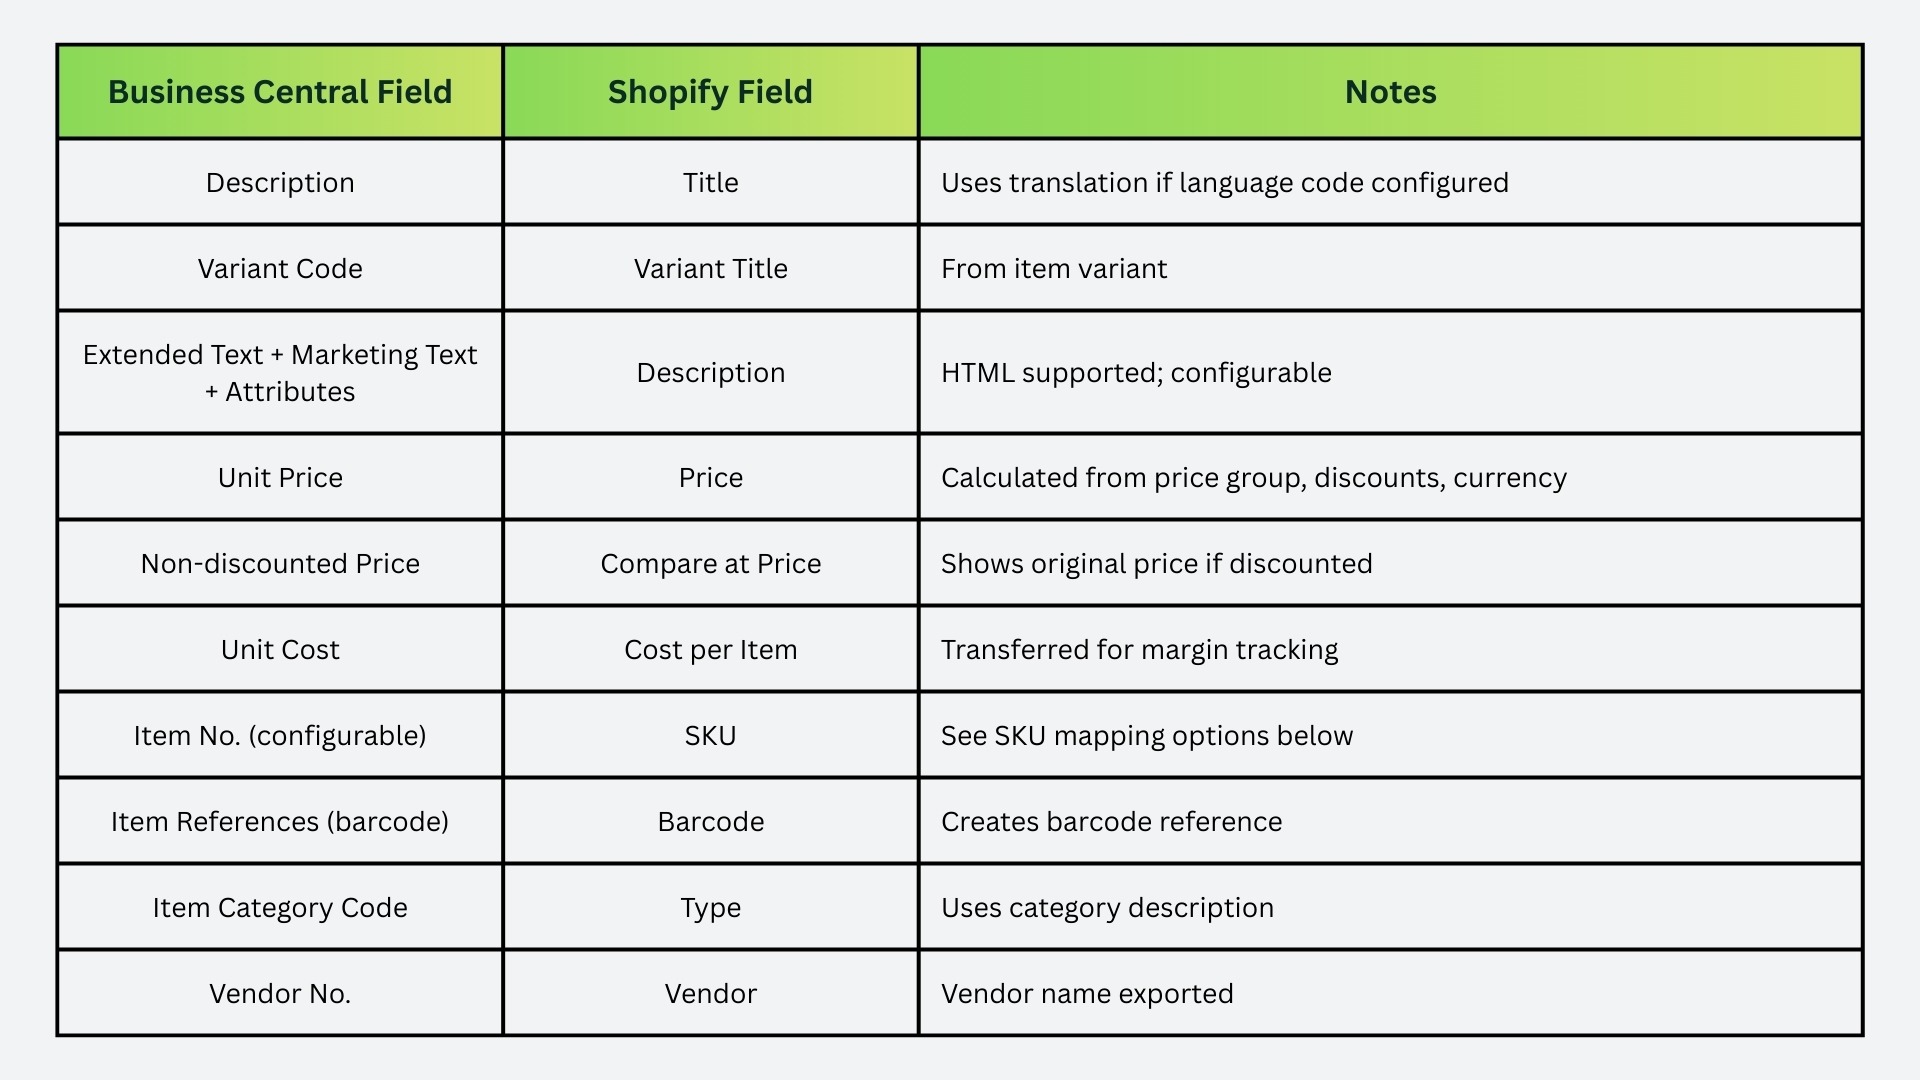
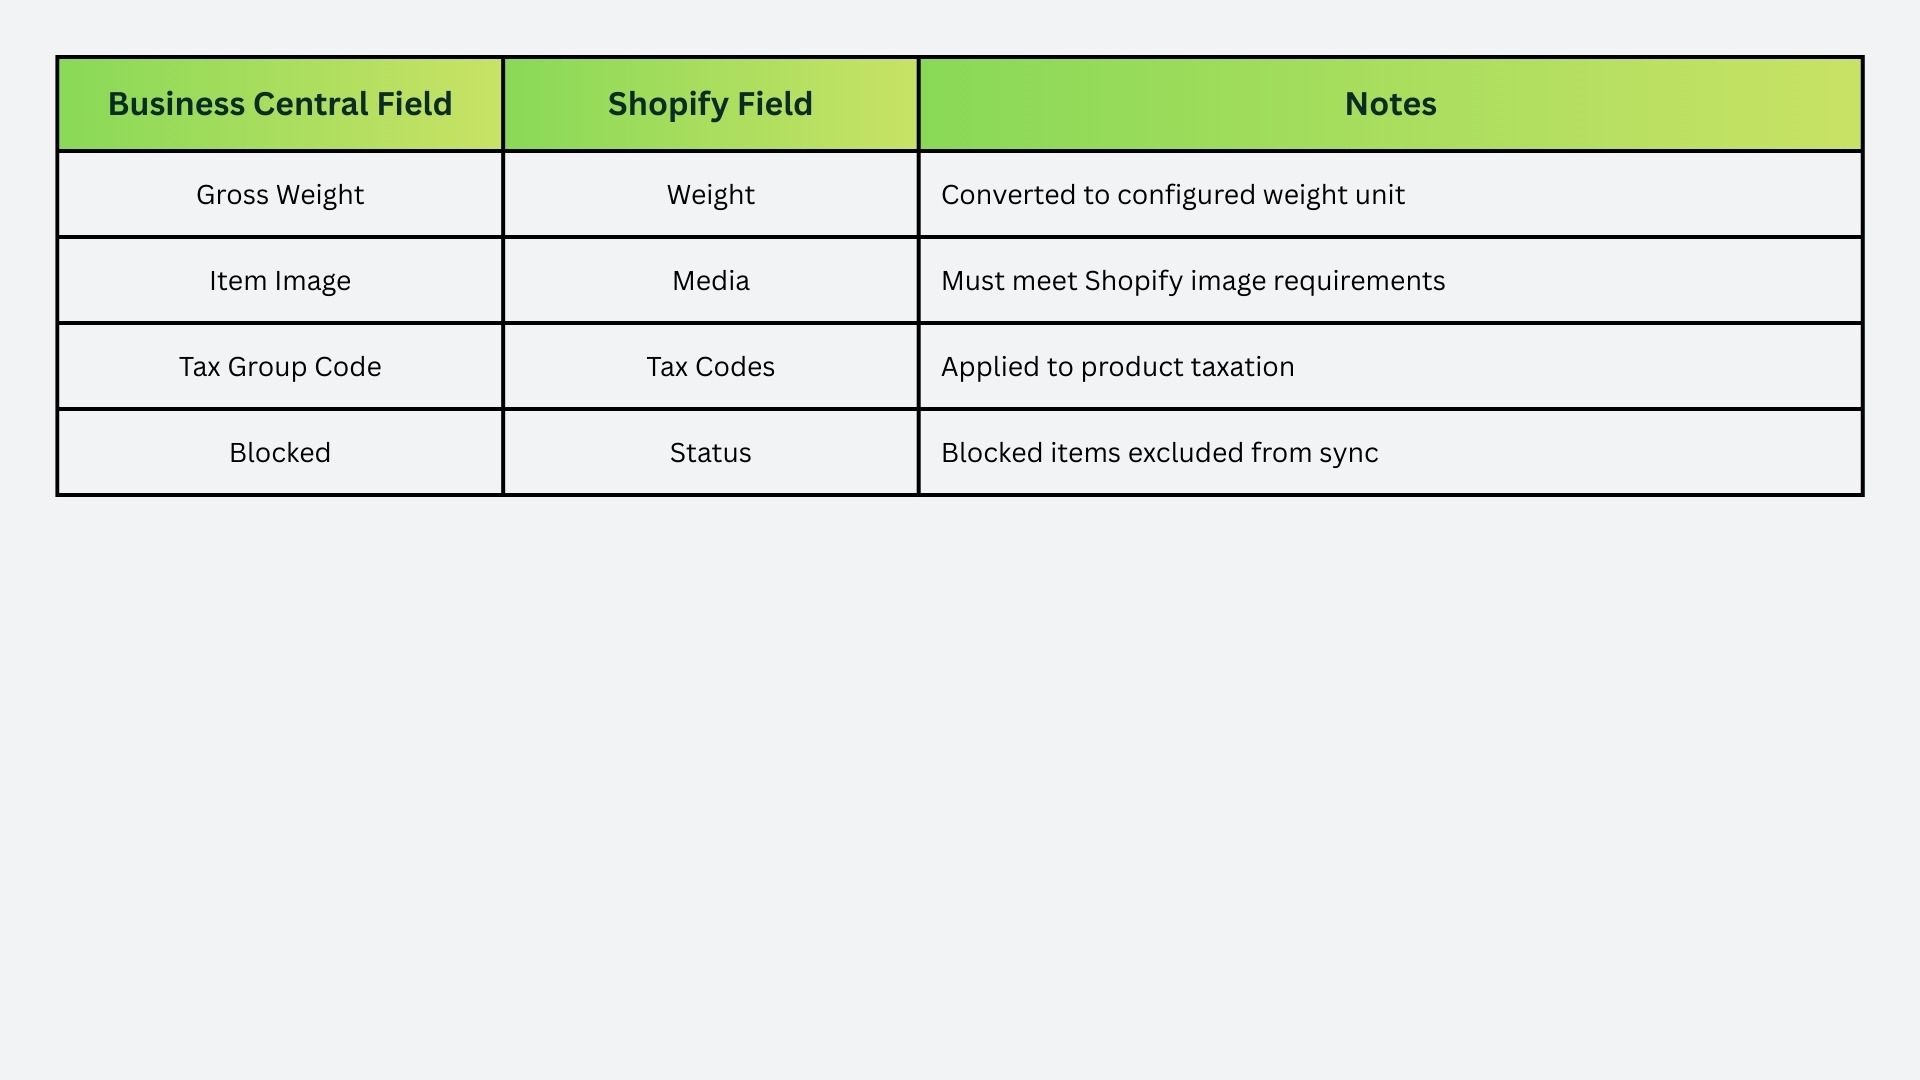
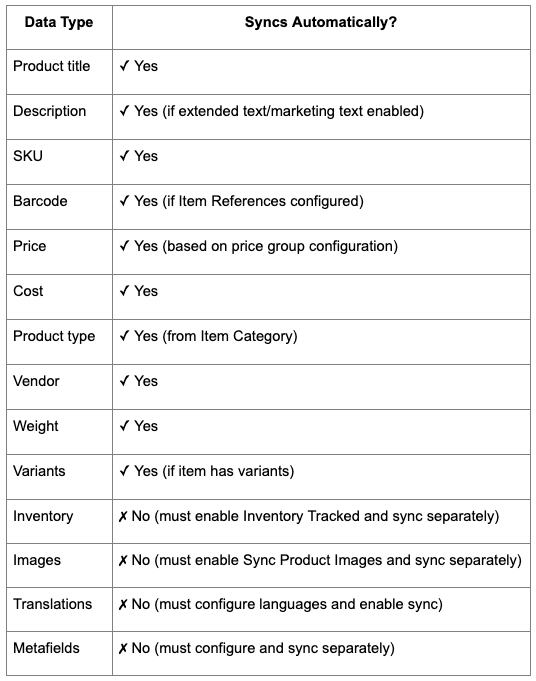
Core Field Mappings: Business Central to Shopify
This table shows what Business Central fields map to Shopify product fields when you export items.
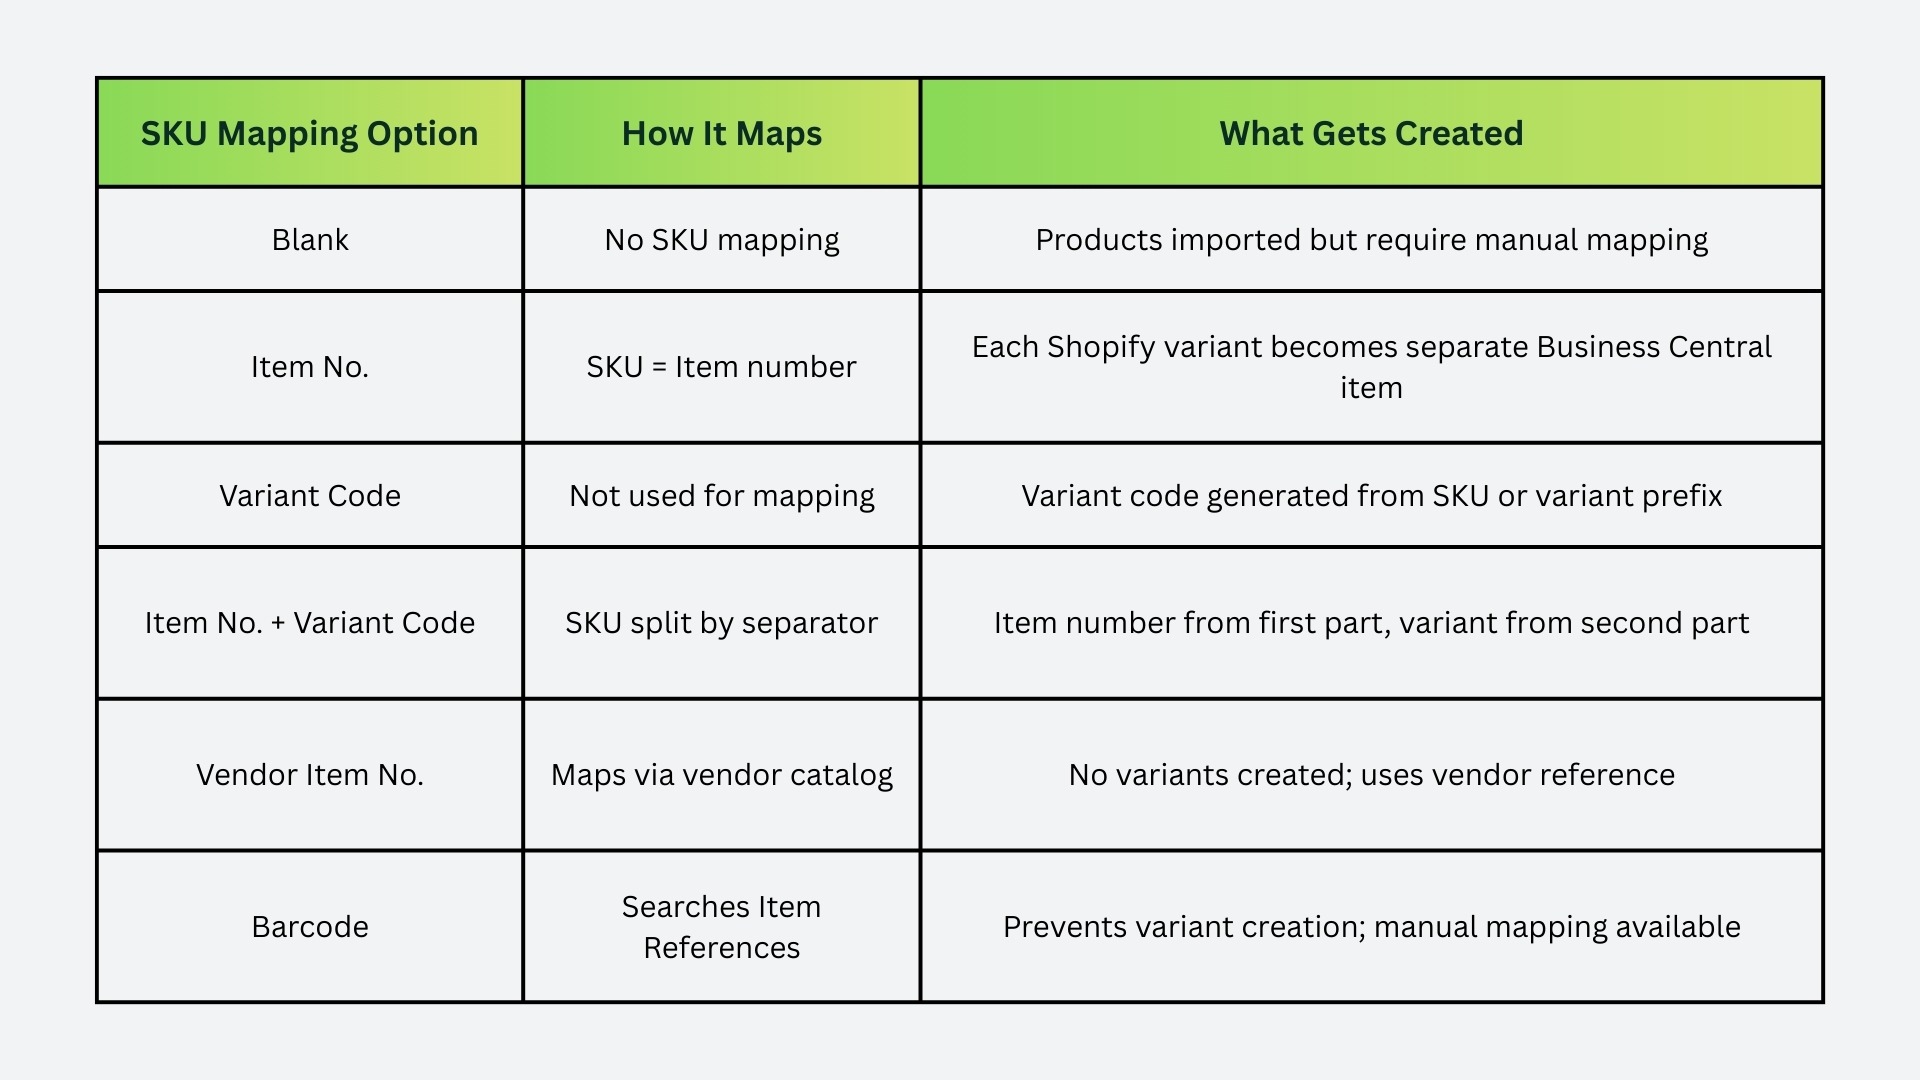
SKU Mapping Options
SKU mapping determines how Business Central identifies items in Shopify. Choose the right option for your catalog structure.
Export (Business Central to Shopify)
Example: Item 1000 with variant RED using "Item No. + Variant Code" and separator "/" creates SKU: 1000/RED
Import (Shopify to Business Central)
Critical setting: SKU Field Separator - Used with "Item No. + Variant Code" to split compound SKUs (common: /, -, _)
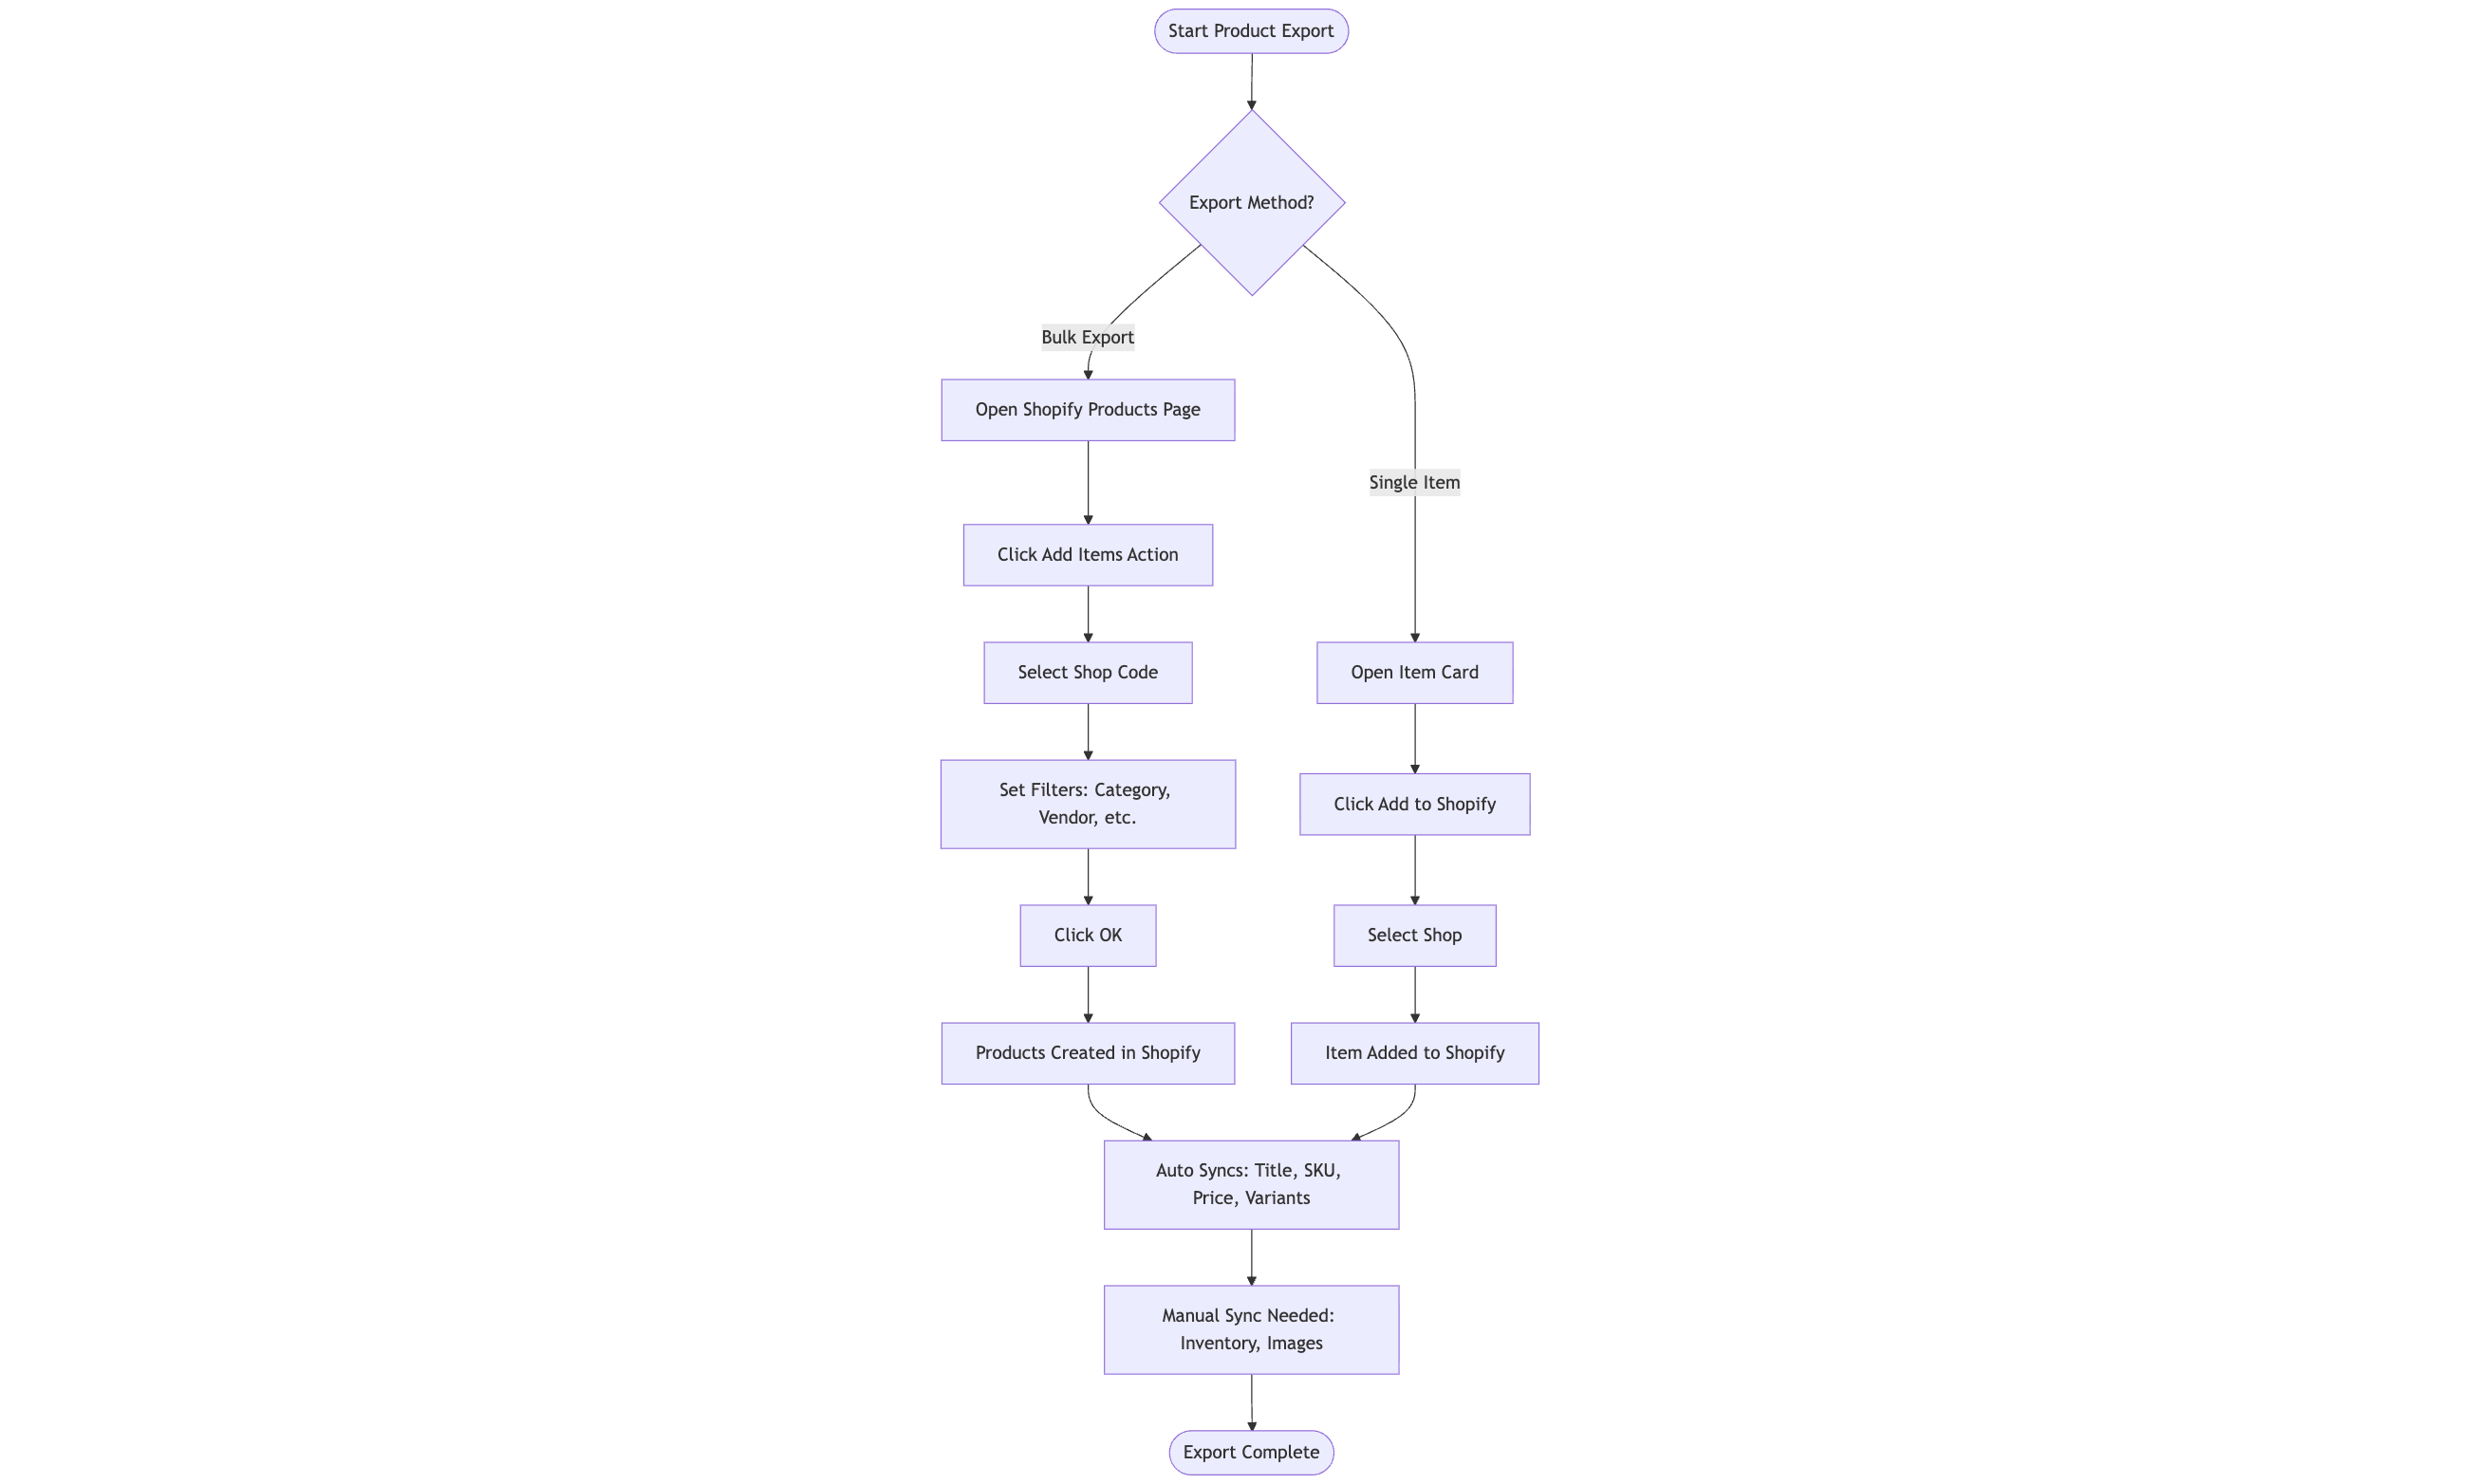
Step-by-Step: Export Items to Shopify
Initial Setup Flowchart
Configuration Steps:
Go to Shopify Shop card in Business Central
Set Sync Item to To Shopify
Enable Can Update Shopify Products (allows ongoing updates)
Deleting image in Business Central doesn't delete from Shopify (manual deletion in Shopify Admin required)
Images must meet Shopify media requirements (size, format, resolution)
Handling Product Variants
Shopify products can have variants (e.g., Color, Size). Business Central items can also have variants. Mapping depends on your catalog structure.
Scenario 1: Business Central Items WITHOUT Variants
Export method: Use Add Item to Shopify action
Result: Single Shopify product with no variants
SKU recommendation: Item No. or Barcode
Scenario 2: Business Central Items WITH Variants
Export method: Use Add Item to Shopify action
SKU configuration: Set SKU Mapping to Item No. + Variant Code
Result: Shopify product with variants matching Business Central item variants
Example:
Business Central: Item 1000, Variants: RED, BLUE, GREEN
Shopify: Product 1000 with 3 variants (SKUs: 1000/RED, 1000/BLUE, 1000/GREEN)
Scenario 3: Multiple Items as Shopify Variants
You can add separate Business Central items as variants of a single Shopify product.
Use case: Different products that should appear as options (e.g., small/medium/large sizes that are different items in Business Central)
How to:
Shopify Products page
Select the parent product
Variants FastTab > Add item as Variant action
Select additional items to add as variants
Important limitations:
Can't add to products with multiple existing options (e.g., Color + Material)
Can't use if UoM as Variant toggle enabled
Item variants themselves don't transfer (only parent items)
Barcode Mapping
Barcodes have highest priority in product matching.
How Barcode Mapping Works
Export: If item has barcode in Item References, exports to Shopify Barcode field
Import: Searches Item References for matching barcode; creates reference if new
Recommendation: Set barcodes on all items and variants for reliable matching during imports.
Setting Up Barcodes
Item Card > Item References action
Add reference with Reference Type = Barcode
Enter barcode value
If item has variants, add barcode for each variant
Unit of Measure as Variant
Shopify doesn't natively support multiple units of measure. Use variants to represent different UoM (piece, box, case).
Enable UoM as Variant
Shopify Shop card
Personalize page, add UoM as Variant toggle
Enable toggle
Set Variant Option Name for UoM (default: "Unit of Measure")
How It Works
Export: Each item UoM becomes a Shopify variant
Example:
Business Central: Item 2000, UoM: PCS (base), BOX (6 PCS), CASE (24 PCS)
Shopify: Product 2000 with 3 variants: PCS, BOX, CASE
Important Considerations
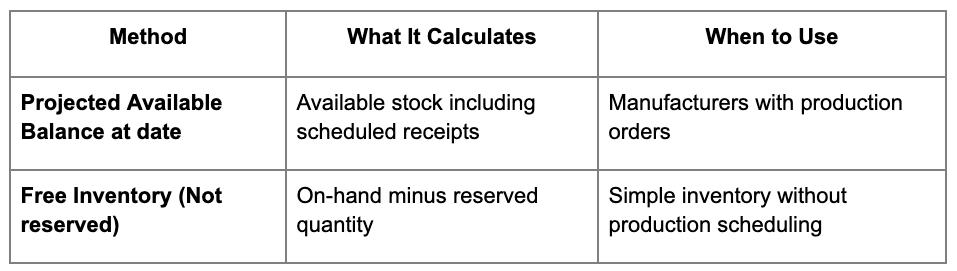
Inventory accuracy: Availability calculated per item, not per UoM. Same quantity shows for all UoM variants adjusted by Qty. per UoM.
Example problem: 6 PCS available shows as 6 for PCS variant and 1 for BOX (6 PCS) variant. Customer could order 6 PCS AND 1 BOX, creating overselling (requires 12 PCS but only 6 available).
SKU management: For items with both matrix variants (Color) and UoM variants, set SKU Mapping = Item No. + Variant Code and ensure Shopify SKUs match across UoM variants.
Recommendation: Only use UoM as Variant if you actively manage inventory to prevent overselling.
Translation Sync
Export product information in multiple languages for international Shopify markets.
Setup Translations
Shopify Shops > Languages action
Click Refresh to import enabled Shopify languages (primary language excluded)
For each language:
Set Language Code matching Business Central language
Enable Sync translations toggle
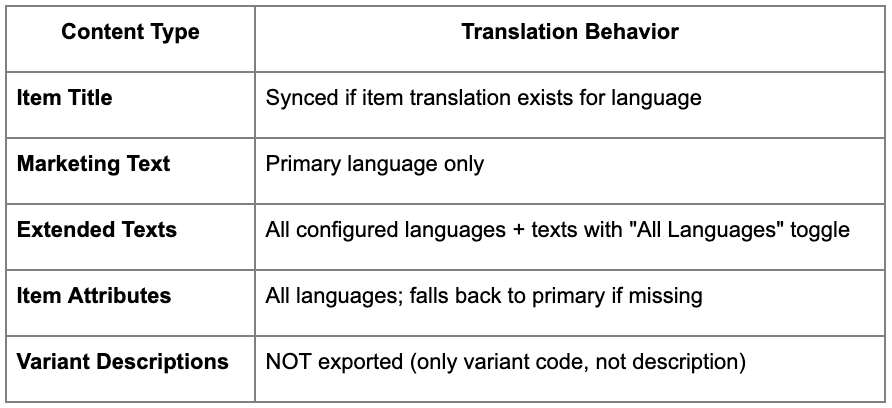
What Gets Translated
B2B Catalog Pricing (Shopify Plus Only)
Shopify Plus B2B catalogs support company-specific pricing.
Setup B2B Catalog Sync
Ensure Shopify access token has B2B permissions
Shopify B2B Catalogs page > Get Catalogs
For each catalog:
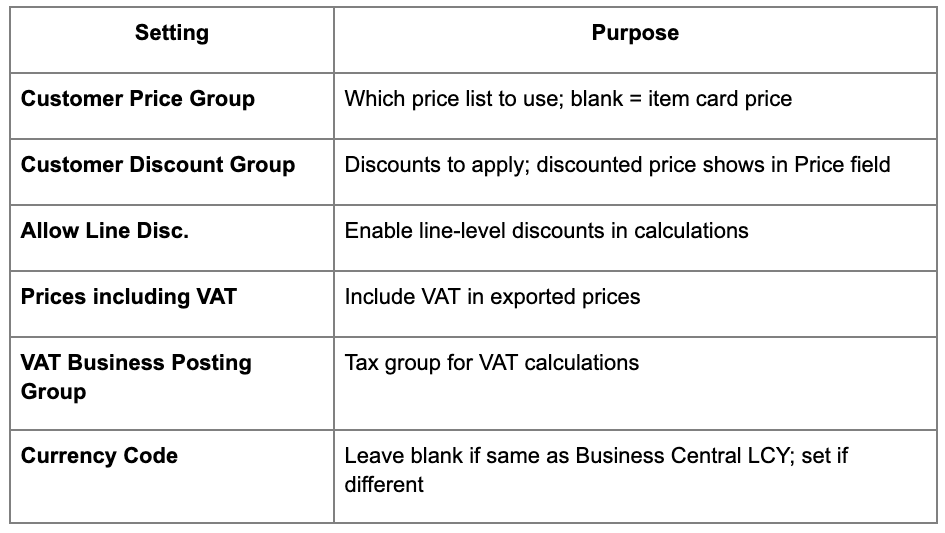
Set Customer Price Group
Set Customer Discount Group
Configure VAT settings
Enable Sync Prices toggle
Click Sync Prices action
Pricing Strategies
Default Strategy: Use Customer Price Group + Discount Group (similar to standard Shopify sync)
Custom Strategy: Set Customer No. field; ignores price groups and uses that customer's configured pricing from customer card
Metafields Sync
Shopify metafields extend product data with custom fields.
When Auto create unknown items enabled, Item Template determines:
Default General Product Posting Group
Default Inventory Posting Group
Default Costing Method
Other item defaults
Configure template thoughtfully to ensure imported items have correct accounting setup.
Handle Blocked Items Properly
Blocked items automatically excluded from sync.
Workflow:
Block item in Business Central when discontinued
Connector skips blocked items on next sync
Manually archive or delete from Shopify Admin if needed
Setting: Action for Removed Products and Blocked Items controls behavior (Blank, Status to Draft, Status to Archived)
Conclusion
Mapping Business Central items to Shopify products requires understanding field mappings, SKU strategy, and sync configuration.
The key decisions are:
SKU Mapping: Choose the format that matches your catalog structure (simple Item No., compound Item No. + Variant Code, or Barcode-driven).
Sync Direction: Determine whether Business Central or Shopify is source of truth for product data.
Inventory and Pricing: Configure how stock levels and prices calculate and sync.
Variants: Plan how Business Central item variants map to Shopify product variants.
Start with a small test batch, verify mappings work correctly, then scale to full catalog. Set up scheduled syncs to keep systems in sync automatically.
Proper field mapping ensures accurate product data, inventory levels, and pricing across both systems. This creates a seamless experience for B2B customers and streamlines operations for manufacturers.


.png)


.png)
