

.png)
Most contact forms and inquiry forms at small manufacturers do exactly one thing: send an email to a general inbox. From there, someone reads it, decides who it is for, and forwards it. If the right person is out that day, it sits. If it comes in on a Friday afternoon, it might not be seen until Monday.
This workflow template changes that. When someone submits your Google Form, n8n reads the submission, checks a routing field (inquiry type, department, product category, whatever you already ask), and sends a formatted notification directly to the right person on your team. Every submission also gets logged to a Google Sheet automatically.
No IT involvement. No new software. Just Google Forms, Gmail, and n8n.
A triggered n8n workflow that:
By the end of this tutorial, a sales inquiry goes to your sales contact, a supplier application goes to your purchasing manager, and a support request goes to your technical team, automatically, the moment the form is submitted.
A Google Form with a routing field. Your form must include a question whose answer determines who should receive the notification. Common examples:
The field should be a multiple-choice (radio button) question, not a free-text field, so the values are predictable for routing.
Google Form connected to a Google Sheet. In your Google Form, click the Responses tab, then the Google Sheets icon to create a linked response sheet. Google Forms automatically appends every new submission as a new row in this sheet. n8n reads from this sheet to detect new submissions: it does not use a Google Forms webhook directly.
A routing table. Before building the workflow, write down the routing rules:
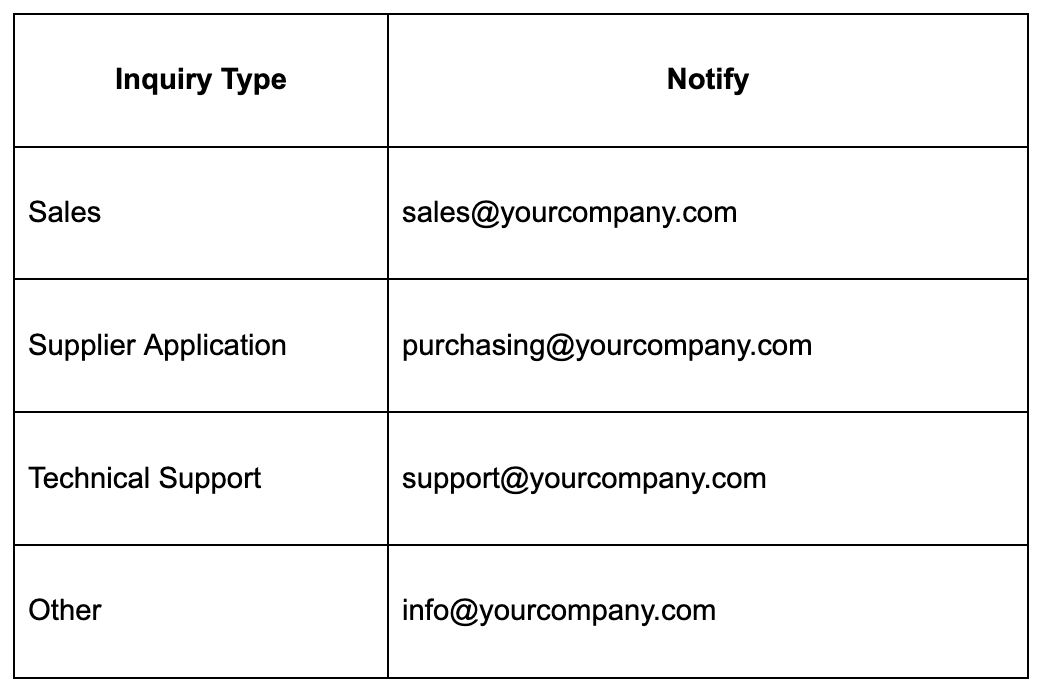
You will encode this table directly in the workflow's Code node.
n8n instance. n8n Cloud or self-hosted, version 1.0 or later.
Google Sheets credentials in n8n. In Credentials, add a Google Sheets OAuth2 credential authorized against the Google account that owns the form and the response sheet.
Gmail credentials in n8n. Add a Gmail OAuth2 credential authorized against the account you want notifications to send from.
The complete node sequence:
Schedule Trigger (every 5 minutes)
    → Google Sheets (Read response sheet: new rows only)
    → IF node (check if any new submissions exist)
      → True: Loop Over Items
                → Code node (look up recipient email from routing table, format notification)
                → Gmail Send (notification to routed recipient)
                → Google Sheets Update (mark row as "Processed" in a tracking column)
      → False: (end, no new submissions this cycle)
The Google Sheets Update node in the loop marks each row as processed so the workflow does not re-notify on the same submission in the next polling cycle.
Before building any nodes manually, use n8n's built-in AI to generate the workflow structure. This gives you a connected starting point in seconds; you then configure credentials and refine the logic in the steps that follow.
Open n8n and create a new workflow. Click the Generate workflow button in the top-right corner of the canvas (the sparkle/AI icon), or look for the AI description bar that appears on an empty canvas.
Use this prompt:
Build a workflow that runs every 5 minutes. Read rows from a Google Sheet linked to a Google Form where the Processed column is blank. For each row, check the inquiry type field. If it says "Sales", send a Gmail notification to the sales team. If it says "Supplier Application", send a Gmail to the purchasing manager. If it says "Technical Support", send a Gmail to the support team. For anything else, send a Gmail to the general inbox. Include all form fields in the notification body. Then mark the Processed column in that row as "Yes".
The AI will generate a set of connected nodes. It will not be fully configured: credentials are missing, field names are placeholders, and the routing logic will need to be updated with your actual email addresses and inquiry type values. That is expected.
What the AI typically gets right:
What you will configure in the steps below:
Once the AI has generated the workflow, proceed to Step 2 to prepare the response sheet before configuring the nodes.
Before building in n8n, add a Processed column to the Google Form response sheet. Open the linked sheet, scroll to the first empty column to the right of the form fields, and add the header "Processed" in row 1. Leave all data rows blank: the workflow will write "Yes" here after notifying.
This is the mechanism that prevents duplicate notifications: the workflow only processes rows where "Processed" is blank.
Create a new workflow and add a Schedule Trigger node.
Set it to run every 5 minutes. Form submissions for sales inquiries and support requests typically warrant a fast response: 5 minutes is a reasonable balance between responsiveness and API call volume. If your form receives fewer submissions (supplier applications, partnership inquiries), every 15 or 30 minutes is fine.
Add a Google Sheets node after the trigger. Configure it:
Run manually to confirm you see your form response data. Note the exact column header names in the output panel: the routing field name must match exactly in the Code node.
Add a Code node after the Google Sheets node. This node filters to only rows where "Processed" is blank.
const items = $input.all();

const unprocessed = items.filter(item => {
  const processed = (item.json['Processed'] || '').trim();
  return processed === '';
});

return unprocessed.map(item => ({ json: item.json }));
This keeps only new submissions. Rows already marked "Yes" are excluded on every run.
Add an IF node after the filter Code node.
Connect the True branch to the Loop Over Items node. Leave the False branch unconnected.
Add a Loop Over Items node on the True branch. Connect it to receive unprocessed rows. No additional configuration needed.
Add a Code node inside the loop. This node looks up the recipient based on the routing field and builds the email notification body.
// Update the routing field name and routing table to match your form
const routingField = 'What is this inquiry about?'; // Exact column header from your form
const routingTable = {
  'Sales': 'sales@yourcompany.com',
  'Supplier Application': 'purchasing@yourcompany.com',
  'Technical Support': 'support@yourcompany.com',
  'Other': 'info@yourcompany.com'
};
const fallbackEmail = 'info@yourcompany.com';

const submission = $json;
const inquiryType = (submission[routingField] || '').trim();
const recipientEmail = routingTable[inquiryType] || fallbackEmail;

// Build the notification body from all form fields
const timestamp = submission['Timestamp'] || '';
const fieldLines = Object.entries(submission)
  .filter(([key]) => key !== 'Processed' && key !== '_rowNumber')
  .map(([key, value]) => `${key}: ${value}`)
  .join('\n');

const subject = `New form submission: ${inquiryType || 'General Inquiry'}: ${timestamp}`;
const body = `A new form submission has been received.\n\n${fieldLines}\n\nPlease respond within your standard timeframe.`;

return [{
  json: {
    recipientEmail,
    subject,
    body,
    inquiryType,
    rowNumber: submission._rowNumber
  }
}];
Adjust routingField to the exact column header of your routing question. Update routingTable with your actual inquiry types (copy them exactly as they appear in the Google Form multiple-choice options) and the corresponding email addresses. The fallbackEmail handles any submission where the routing field value does not match the table: useful for the "Other" option or unexpected values.
Run the node against a test row to confirm recipientEmail resolves correctly for each inquiry type.
Add a Gmail node inside the loop, after the routing Code node. Set the operation to Send Email.
Configure it:
The subject will read something like: New form submission: Sales: 2026/05/30 9:14:22
The body will contain every field from the form response, automatically formatted: no manual selection of which fields to include. As you add or remove questions from the form, the body updates automatically because the Code node reads all fields dynamically.
After the Gmail Send node, still inside the loop, add a Google Sheets node with the operation Update Row.
Configure it:
This writes "Yes" to the Processed column immediately after the notification is sent. The next time the workflow runs, this row will be excluded by the filter in Step 4.
Toggle the workflow to Active. Test by submitting a real or test entry to your Google Form, waiting up to 5 minutes, and confirming the notification arrives at the correct email address and the row is marked "Yes" in the response sheet.
The Processed column must be added to the sheet before activating. If "Processed" does not exist as a column header, the filter in Step 4 will treat all rows as unprocessed and re-notify on every cycle. Add the column header before turning the workflow on.
New form questions add new columns automatically. When you add a question to the Google Form, Google Sheets adds a new column to the response sheet. The routing Code node in Step 7 reads all fields dynamically, so new questions appear in the notification body without any workflow changes. The only exception: if you rename the routing question, you must update routingField in the Code node to match the new column header.
The routing table must match the form options exactly. Google Forms preserves the exact text of each multiple-choice option when writing to Sheets. If your form option is "Sales Inquiry" but your routing table has "Sales", the lookup will return undefined and fall back to the fallback email. Copy the options text directly from the form into the routing table to avoid this.
Add a confirmation email to the person who submitted the form. Most Google Forms have an email field. Pull that field in the Code node and add a second Gmail Send node after the notification: a simple acknowledgment telling the submitter their inquiry was received and who will follow up.
Add a Slack notification alongside Gmail. If your team uses Slack, replace or supplement the Gmail Send node with a Slack node. Route sales inquiries to #sales, support requests to #support, and supplier applications to #purchasing. Same routing table logic, different destination node.
Build a weekly form summary. Add a separate scheduled workflow (runs every Monday at 8am) that reads the response sheet, counts submissions by inquiry type for the previous week, and sends a summary to your manager. Useful for spotting volume trends in specific inquiry types over time.
Form-based routing is one of the fastest automation wins for small manufacturing teams because the form and the sheet already exist: Google Forms creates a response sheet automatically, and most teams have some version of a contact or inquiry form. The workflow replaces a manual forwarding habit that takes two to five minutes per submission and sometimes does not happen at all.
It also demonstrates a pattern your team will use repeatedly: read from a sheet, apply logic to decide what to do, take a different action based on the result, log the outcome. Quote routing, PO approvals, supplier onboarding: all of them follow this same structure. Build the form routing workflow once and the next build takes half the time.
The Flow Kaizen guide covers how to sequence your first five automation builds, starting with quick wins like this one and building toward more connected workflows as your team's confidence grows.

.png)
