

.png)
When a new wholesale account is approved in Shopify B2B, someone has to manually open the company record, navigate to the catalog section, and assign the right catalog before the buyer can see correct pricing. For stores with a small number of accounts, this is a minor inconvenience. For manufacturers onboarding multiple new accounts per week across several pricing tiers, it is a consistent source of errors and delays.
The most common failure mode: a buyer is approved, logs in, and sees either no pricing at all or the wrong pricing because their catalog hasn't been assigned yet. This undermines the first impression of your B2B portal and often generates support tickets from buyers who can't add products or see prices.
This Shopify Flow workflow removes that manual step. When a new company account is created and tagged with a pricing tier, Flow automatically assigns the correct catalog to that company's location using Shopify's API, before the buyer ever logs in.
Who this is for:
What it handles automatically:
What it requires:
This workflow uses the Send Admin API Request action, which is available on Shopify Plus. This action lets Flow call Shopify's own API without needing a custom app or external webhook.
The workflow listens for a company being updated (or created) in Shopify with a specific pricing tier tag. When the condition is met, it fires a GraphQL mutation to assign the catalog associated with that tier to the company's primary location.
 ┌─────────────────────────────────┐
 │  Company updated                │  ← Trigger
 └─────────────┬───────────────────┘
               │
               ▼
 ┌──────────────────────────────────────────┐
 │  Company tags contain a tier tag?        │  ← Condition group (one branch per tier)
 │  (tier-gold / tier-silver / tier-distrib)│
 └──────┬──────────────────────────┬────────┘
   TIER-GOLD                  TIER-SILVER         (and so on per tier)
        │                          │
        ▼                          ▼
 ┌──────────────────┐   ┌───────────────────┐
 │ Send Admin API   │   │ Send Admin API    │
 │ Request:         │   │ Request:          │
 │ Assign Gold      │   │ Assign Silver     │
 │ Catalog ID to    │   │ Catalog ID to     │
 │ company location │   │ company location  │
 │                  │   │                   │
 │ Tag company:     │   │ Tag company:      │
 │ catalog-assigned │   │ catalog-assigned  │
 └──────────────────┘   └───────────────────┘
Each pricing tier is a separate condition branch, each pointing to a different catalog ID in the API request. The structure is the same across all branches. Only the catalog ID changes.
Before setting this up:
Catalog IDs are not displayed in the Shopify admin UI. You need to retrieve them from the Shopify GraphQL API or the admin URL.
Method 1: From the admin URL
Navigate to a catalog in your Shopify admin. The URL will look like:
https://[your-store].myshopify.com/admin/catalogs/[catalog-id]
The number at the end of the URL is the catalog's numeric ID. Note this for each of your catalogs.
To use it in the GraphQL mutation, format it as a Global ID:
gid://shopify/Catalog/[catalog-id]
Method 2: GraphQL API
Run the following query in the Shopify GraphQL Explorer (accessible from Apps > Develop Apps > API credentials > GraphQL Explorer):
{
  catalogs(first: 10) {
    edges {
      node {
        id
        title
      }
    }
  }
}
This returns all your catalogs with their Global IDs. Copy the id value for each catalog you want to assign.
From your Shopify admin, go to Apps > Flow. Click Create workflow.
Click Select a trigger and choose:
Company updated
Use "Company updated" rather than "Company created" because in most approval flows, the pricing tier tag is applied after the company record is created, either during a manual review step or by a prior Flow workflow. "Company updated" catches the tag addition whenever it happens.
If your workflow creates companies and applies tags simultaneously (via a single API call or Shopify's import), "Company created" also works as the trigger. Test both and use whichever fires at the point where the tag is already present on the company record.
Click Add condition after the trigger.
Build a separate condition for each pricing tier your store uses. Set the group to Any condition is true if you want a single branch to catch multiple tiers, or use separate if / else if branches to route each tier to a different catalog.
The most maintainable structure for most manufacturers is separate condition branches (one per tier), because each branch sends a different catalog ID in the API request.
Condition for Tier Gold:

Condition for Tier Silver (else if branch):

Condition for Distributor tier (else if branch):

Add as many branches as you have pricing tiers.
In each tier branch, add this action:
Action: Send Admin API Request
This action calls Shopify's GraphQL API from inside Flow. Configure it as follows:
GraphQL mutation body:
mutation {
  companyLocationAssignCatalogs(
    catalogIds: ["gid://shopify/Catalog/YOUR_CATALOG_ID"]
    locationId: "{{company.locations.edges[0].node.id}}"
  ) {
    catalogsAssigned {
      id
      title
    }
    userErrors {
      field
      message
    }
  }
}
Replace YOUR_CATALOG_ID with the actual catalog ID for this tier (e.g., the Gold catalog ID in the Gold branch, the Silver catalog ID in the Silver branch).
The {{company.locations.edges[0].node.id}} variable references the first location on the company record from the Flow trigger data. If a company has multiple locations, this assigns the catalog to the first location only. See the Customization Tips section for handling multi-location companies.
Note on authentication: The Send Admin API Request action runs under the Flow app's API credentials. It has permission to call Shopify's Admin API for mutations on your store data. You do not need to supply a separate API key.
After the API request action in each branch, add:
Action: Add tag to company
This tag serves two purposes:
To add that protection, go back to Step 3 and add a second condition to each branch:
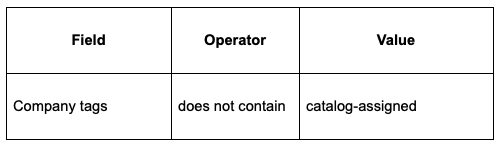
This prevents the workflow from firing on companies that already have a catalog assigned.
Name the workflow: Auto-Assign Catalog on Company Approval
Click Turn on workflow.
 ┌──────────────────────────────────────────┐
 │  TRIGGER: Company updated                │
 └────────────────────┬─────────────────────┘
                      │
                      ▼
 ┌──────────────────────────────────────────┐
 │  GUARD: Company tag does NOT contain     │
 │  "catalog-assigned"                      │  ← Prevents re-triggering
 └──────┬───────────────────────────┬───────┘
       TRUE                        FALSE
        │                           │
        ▼                           ▼
 ┌──────────────────────────────┐  ┌──────┐
 │  Branch on tier tag          │  │ END  │
 └───────────────┬──────────────┘  └──────┘
                 │
       ┌─────────┴──────────┬───────────────┐
       ▼                    ▼               ▼
  [tier-gold]          [tier-silver]   [tier-distributor]
       │                    │               │
       ▼                    ▼               ▼
  Assign Gold           Assign Silver   Assign Distributor
  Catalog via API       Catalog via API Catalog via API
       │                    │               │
       ▼                    ▼               ▼
  Tag company:          Tag company:    Tag company:
  catalog-assigned      catalog-assigned catalog-assigned
Handle companies with no matching tier tag
Add a final else branch at the end of your condition chain with no tier condition, and use it to send an internal alert when a company is updated but doesn't match any known tier. This catches companies that were created without a pricing tier tag and flags them for manual assignment.
Action in the catch-all branch:
Assign catalogs to multiple locations
If your company accounts frequently have more than one location, modify the mutation to loop through all locations. You can do this by running multiple companyLocationAssignCatalogs mutations in a single API request body, each targeting a different location ID. Alternatively, run a separate branch for each location using the location ID variables available in the trigger data.
Trigger on account approval instead of tag addition
If you use a prior Flow workflow to approve company accounts and apply tier tags in a single step, chain the workflows. The approval workflow applies the tier tag, which triggers the catalog assignment workflow. The separation keeps each workflow focused and easier to maintain.
Combine with payment terms assignment
The companyLocationUpdate mutation (separate from catalog assignment) allows you to set payment terms on the location in the same step. If your pricing tiers also correspond to standard payment terms (Gold tier gets Net 60, Silver tier gets Net 30), add a second Send Admin API Request action in each branch to set terms at the same time as catalog assignment.
Log the assignment result
Use the "Add company note" action after the API request to record which catalog was assigned and when. This creates an internal audit trail on the company record in your Shopify admin.
This workflow assigns catalogs to company locations. It does not:
For context on how catalogs fit into a broader B2B launch, see What Manufacturers Need to Know Before Launching on Shopify Plus.


.png)
