
.png)
Approving a wholesale account is only the first step. What happens in the next few minutes is what determines whether that new customer places their first order quickly or goes quiet.
Most B2B stores approve an account and send nothing, or send a generic Shopify notification that gives the customer no direction. The buyer logs in, sees an unfamiliar storefront, doesn't know how to find their pricing or add team members to the account, and either emails support or moves on.
This Shopify Flow workflow triggers a welcome email the moment a customer account is approved. The email gives the customer everything they need to get started: a direct link to their account portal, their catalog, instructions for setting up their company profile, and a contact for questions. For stores using Shopify's B2B Companies feature, it can also include a link to invite additional buyers from their team.
Who this is for:
What it handles automatically:
This pairs directly with the customer approval workflows. Approval and onboarding become a single automated sequence rather than two separate manual steps.
The workflow listens for a tag being added to a customer record. When your team (or the auto-approve workflow) approves a customer and adds the approved tag, this workflow fires and delivers the welcome sequence.
Using a tag as the trigger makes this workflow compatible with any approval method: manual approval in Shopify admin, the auto-approve Flow workflow, or a custom approval process that tags customers on completion.
Customer tag added: "approved"
            |
            v
Send welcome email to customer
(account portal link, catalog link, next steps, contact info)
            |
            v
Send internal alert to sales rep
(new active account notification)
            |
            v
[Optional] Wait: 5 days
            |
Has customer placed an order?
            |
   No  |  Yes
       |
Send follow-up    End
check-in email
The optional follow-up step is what turns a one-time welcome into a lightweight onboarding sequence. It catches newly approved customers who haven't engaged yet and gives them a second touchpoint without any manual effort.
Before setting this up, confirm the following:
From your Shopify admin, go to Apps > Flow. Click Create workflow in the top right.
Click Select a trigger and choose:
Customer tag added
In the trigger configuration, set:
This fires every time the approved tag is added to any customer record, regardless of who or what added it. If you use different tags for different approval tiers (for example, approved-wholesale vs. approved-trade), set up a separate version of this workflow for each tag.
If your store uses the Auto-Approve Verified Business Emails workflow, that workflow adds the auto-approved tag. Either update that workflow to also add approved, or set this workflow's trigger to match auto-approved directly.
Add the first action:
Action 1: Send email to customer
Hi {{customer.firstName}},

Your account has been approved and you now have full access to [Your Company Name]'s wholesale portal.

Here's where to start:

Log in to your account:
[Your account portal URL]

Browse your catalog:
[Your B2B storefront URL]

What you can do now:
- View your pricing and available products
- Place orders directly online
- Reorder from your order history
- Add team members to your company account (instructions below)

Adding your team:
If you'd like other buyers at your company to place orders under your account, log in to your account portal and go to Company > Invite team member. Each person you invite gets their own login linked to your company's pricing and credit terms.

Questions?
Contact your account representative at [rep email or general contact].

[Your company name]
[Website]
Customize the body to match your store's language and structure. The key elements every welcome email should include:
Add a second action to alert the internal team:
Action 2: Send internal email
A new wholesale account has been approved and the welcome email has been sent.

Customer: {{customer.firstName}} {{customer.lastName}}
Company: {{customer.defaultAddress.company}}
Email: {{customer.email}}
Phone: {{customer.phone}}

View their account:
https://admin.shopify.com/customers/{{customer.id}}
This gives your sales team an immediate signal to reach out personally if the account is high-value, in a target industry, or warrants a direct introduction.
After the welcome email actions, add a wait step:
Action: Wait
After the wait, check whether the customer has placed an order. The cleanest way to do this in Flow is to check their order count:
Condition: Customer orders count
If the condition is true (no orders yet), send a follow-up:
Action: Send email to customer
Hi {{customer.firstName}},

Your wholesale account has been active for a few days and we wanted to check in.

If you have any questions about navigating the portal, finding products, or placing your first order, we're happy to help.

Reply to this email or contact us at [contact info].

[Your company name]
Keep the follow-up short. It's a check-in, not a sales pitch.
Name the workflow: Welcome Sequence on Approval
Click Turn on workflow. From this point, every newly approved customer receives the welcome email automatically.
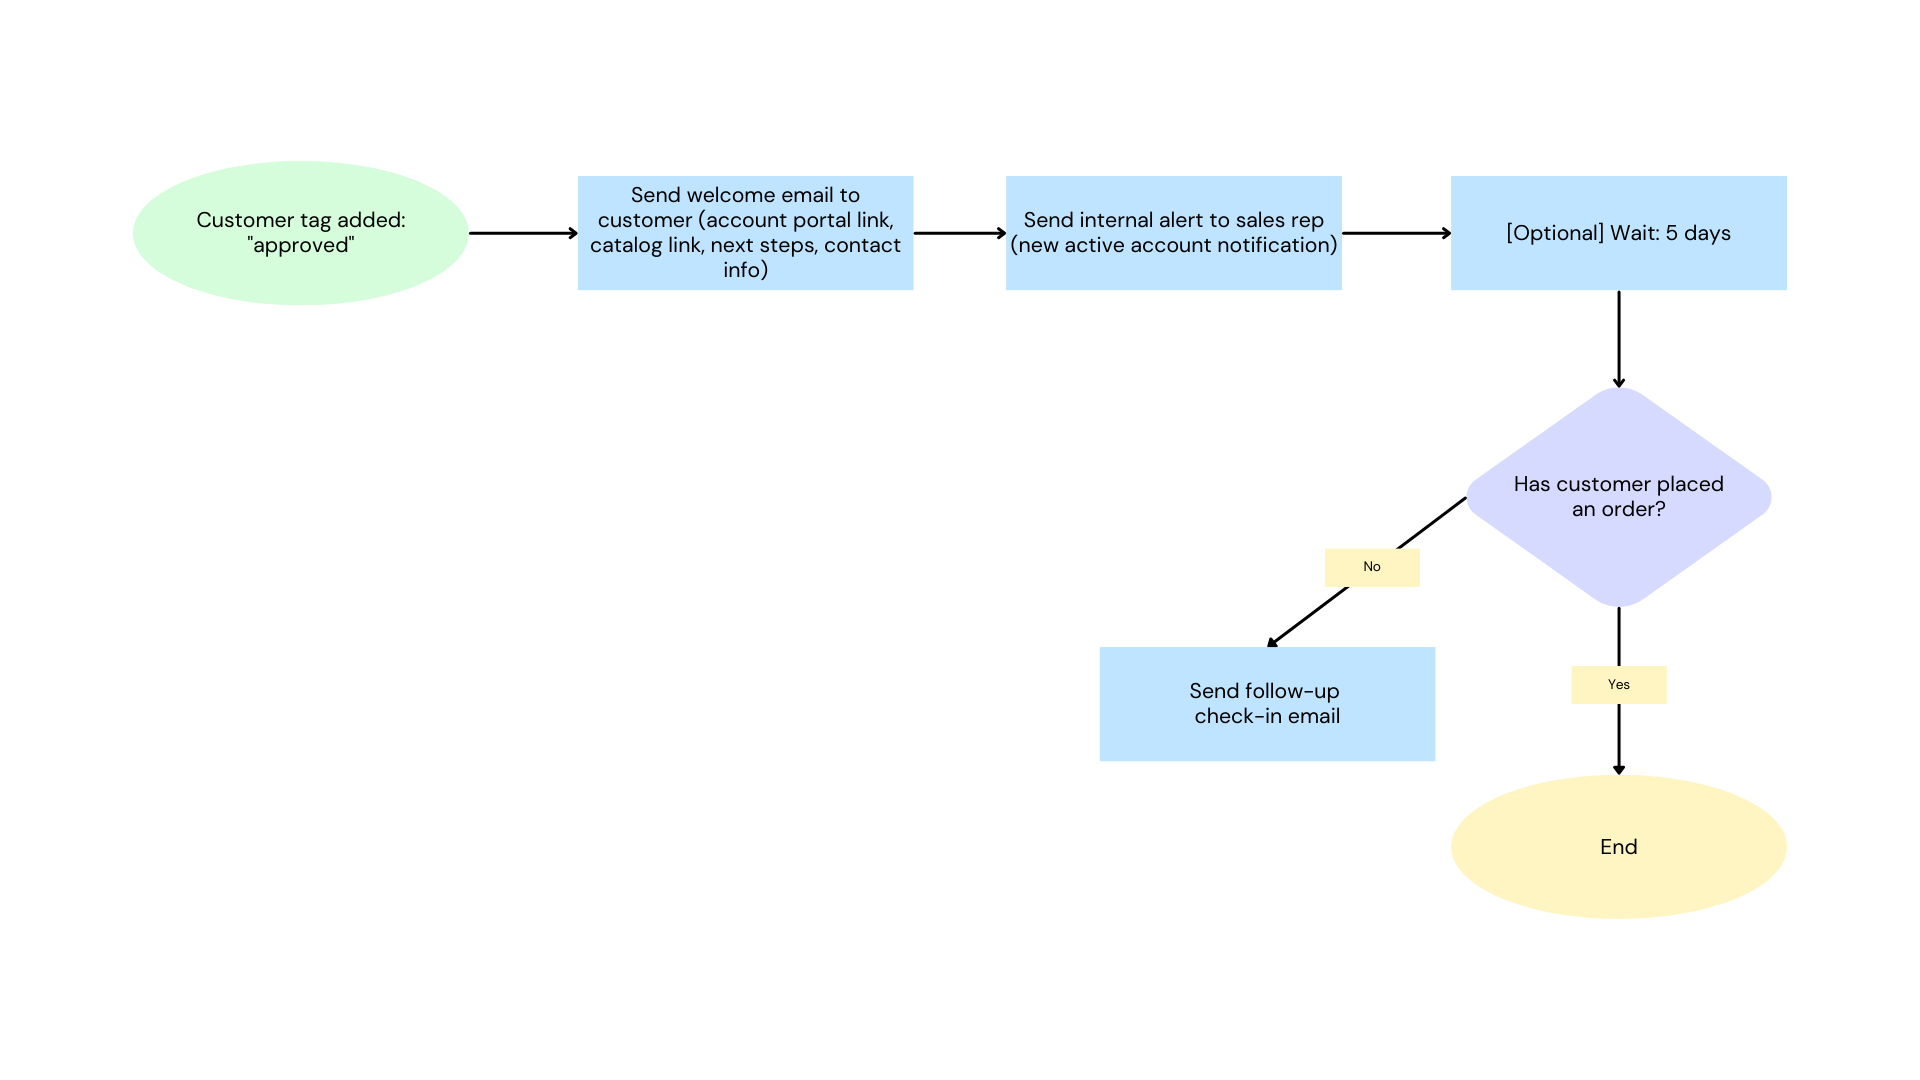
Here is the full workflow at a glance:
Trigger: Customer tag added = "approved"
    |
    Action 1: Send welcome email to customer
    (portal link, catalog link, team invite instructions, contact)
    |
    Action 2: Send internal alert to sales rep
    (customer name, company, email, link to admin record)
    |
    [Optional] Wait: 5 days
    |
    [Optional] Condition: Customer orders count = 0?
        |
        YES: Send follow-up check-in email
        NO: End
Segment the welcome email by customer type
If you approve different customer types (distributors, contractors, end-users), add a condition after the trigger to check for a secondary tag that identifies the customer type, then send a different welcome email with relevant catalog links and instructions for each segment.
Example:
Include a catalog PDF or resource link
If your wholesale catalog is available as a PDF or you have a resources page (spec sheets, line sheets, product guides), include the link in the welcome email body. This is especially useful for manufacturing and fabrication customers who need technical documentation before placing a first order.
Assign to a company automatically
If you use Shopify's B2B Companies feature and your approval process involves creating a company record, extend this workflow to include a Create company or Add customer to company action before sending the welcome email. This ensures the customer has the correct pricing catalog and credit terms assigned at the moment they log in for the first time.
Adjust the follow-up window based on your buying cycle
Five days is a reasonable default for most wholesale stores. For manufacturing businesses where buying decisions take longer, extend the wait to 10 or 14 days. For consumables or frequently purchased products, 2 to 3 days may be more appropriate.
Route the internal alert by territory or industry
If your sales team is organized by region or industry vertical, add a condition before the internal alert that checks for a customer address field or tag, then route the alert to the correct rep. This prevents all new account alerts from landing in a shared inbox and getting missed.
This workflow handles outbound communication after approval. It does not manage the approval decision itself, company profile creation, or catalog assignment. For those steps, build companion workflows or handle them as part of your manual review process before applying the approved tag.
For the approval steps that trigger this workflow, see Flow: Auto-Approve Verified Business Emails and Flow: New Wholesale Applicant Queue.
For more on how Shopify's new customer accounts work for B2B, including the company and location structure, see Customer Accounts vs. Legacy Accounts: Which Should You Use for Shopify B2B?.

.png)
