
.png)
Inventory synchronization between Microsoft Dynamics 365 Business Central and Shopify keeps your stock levels accurate across both systems. Configure it wrong, and you'll oversell products, frustrate customers, or hold excess inventory.
This guide focuses specifically on inventory sync configuration, calculation methods, location mapping, and troubleshooting. For product field mapping, see our guide on How to Map Business Central Items to Shopify Products.
Before you can sync inventory, two conditions must be met:
1. Inventory tracking enabled in Shopify
In Shopify Admin, each product or variant must have Track quantity enabled. Without this, Shopify won't accept inventory updates from Business Central.
2. Inventory sync enabled for Shopify locations
In Business Central's Shopify Shop Locations page, you must configure which locations participate in inventory sync and how stock is calculated.
In Business Central, go to Shopify Shops > select shop > Locations > Get Shopify Locations to import all locations from your Shopify store.
Set the Location Filter field to sync inventory only from specific Business Central locations.
Example: To sync only EAST and WEST warehouses, enter EAST|WEST (pipe character separates locations).
Use location filters to exclude internal transfer locations, separate inventory for different sales channels, or isolate damaged stock.
Choose between two calculation methods:
Enable Default Product Location for locations that should participate in sync. This marks the location for inventory record creation and synchronization.
Important: Don't enable this for both standard Shopify locations and fulfillment service locations simultaneously.
The stock calculation method determines how Business Central calculates the available quantity to send to Shopify.
How it works:
Calculates inventory on hand minus outstanding sales orders, based on the sync date.
Example scenario:
You have 10 units of Part #12345 in stock. You have two outstanding sales orders:
Inventory sync results:
.png)
Best for:
Drawback:
How it works:
Calculates only inventory that's physically available and not reserved from item ledger entries. Ignores sales orders that aren't reserved against physical stock.
Example scenario:
You have 10 units of Part #12345 in stock. You have three outstanding sales orders:
Inventory sync result:

Orders B and C don't affect the calculation because they're either not reserved or reserved against incoming stock (purchase orders), not existing inventory.
Best for:
Drawback:
Use Projected Available Balance if:
Use Free Inventory if:
For most manufacturers and B2B businesses, Projected Available Balance is the safer default.
Business Central supports two approaches to location mapping and fulfillment.
Use this if you manage fulfillment directly (your own warehouses, retail stores, or POS locations).
How it works:
Configuration in Business Central:
Enable Default Product Location for multiple locations where Is Fulfillment Service is disabled.
Example:
You have three locations in Shopify:
Business Central configuration:
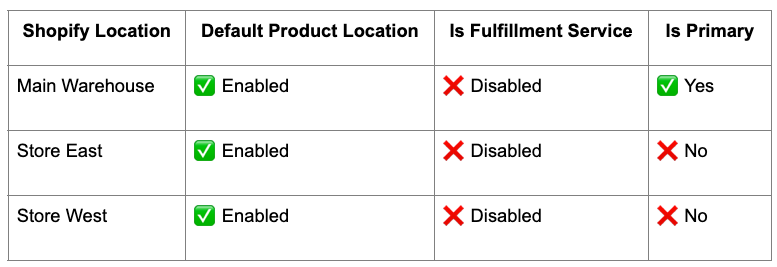
Result: Inventory syncs from Business Central to all three Shopify locations. Shopify decides which location fulfills each order based on its location priority rules.
Use this if you outsource fulfillment to a third-party logistics provider (3PL) or fulfillment service.
How it works:
Configuration in Business Central:
Enable Default Product Location only for locations where Is Fulfillment Service is enabled.
Example:
You use ShipBob for fulfillment. You create a Business Central Fulfillment Service location to represent the 3PL.
Business Central configuration:
.png)
Result: Inventory syncs from multiple Business Central locations (EAST and WEST warehouses) to a single Shopify fulfillment service location. The 3PL receives inventory data and handles fulfillment.
Don't enable Default Product Location for both standard Shopify locations and fulfillment service locations simultaneously. Choose one approach: direct fulfillment or 3PL fulfillment.
Trigger manual sync from Shopify Shops (select shop > Sync Inventory) or Shopify Products (select products > Sync Inventory).
Use for testing configuration, updating after physical counts, or correcting discrepancies immediately.
Schedule recurring syncs using Business Central's Job Queue. Create a new entry, set Object Type to Codeunit, enable Recurring Job, select days, and define frequency (e.g., 60 minutes for hourly).
Recommended sync frequencies:
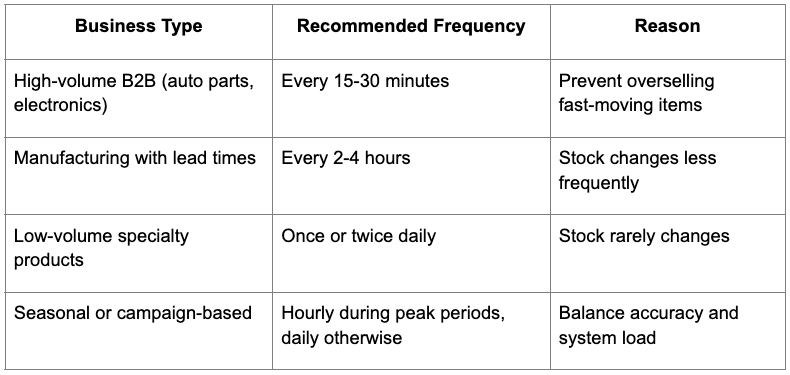
More frequent syncs increase API usage and system load. Balance accuracy with performance.
Shopify allows you to control what happens when inventory reaches zero.
Default Inventory Policy options:
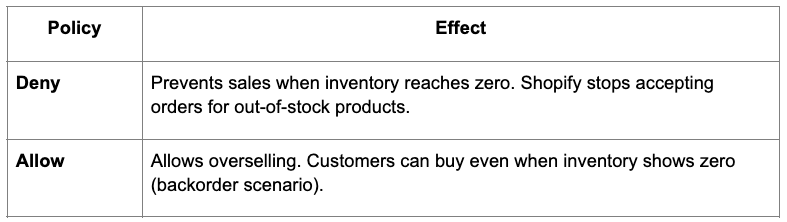
Configure at Shopify Shop card > Default Inventory Policy field.
Use Deny for limited availability, custom orders, or high-value items. Use Allow for quick-restock items, backorders, or drop-shipped products.
Changes sync to Shopify only if Can Update Shopify Products is enabled.
Shopify bundle apps prevent API-based inventory updates and manage bundle inventory based on component availability.
Solution: Set bundle products to Non-inventory or Service type in Business Central (Item card > Type field). Product syncs to Shopify, but inventory updates are skipped.
Business Central automatically excludes Non-inventory and Service item types from inventory sync. Use for digital products, services, or bundles managed by Shopify apps.
Business Central supports selling items in multiple units of measure (e.g., PIECE vs. BOX of 6).
Problem: If you map units of measure as Shopify variants (e.g., Variant 1: "1 Piece", Variant 2: "Box of 6"), inventory is calculated per item, not per UoM. This creates inaccurate availability in Shopify.
Example:
You have 100 pieces in stock. In Business Central, this is:
If you create two Shopify variants (Piece and Box), both show 100 available, which is incorrect. The box variant should show 16.
Solution: Don't use Shopify variants for UoM. Instead:
Option 1: Create separate Shopify products for each UoM
Sync inventory separately for each.
Option 2: Only sell in one UoM on Shopify (e.g., pieces only). Handle box sales offline or through a different channel.
For more on variant mapping, see our guide on How to Map Business Central Items to Shopify Products.
When you add a new location in Shopify Admin, Shopify doesn't automatically create inventory records for existing products.
Solution: Manually assign inventory to the new location in Shopify Admin (Products > Select product > Inventory > Edit locations) before running sync. Use Shopify's bulk editor for multiple products.
When inventory isn't syncing correctly, follow this diagnostic process:
Common errors in logs:

Most manufacturers sync from Business Central to Shopify, but some scenarios require reverse sync:
When orders import from Shopify to Business Central, the connector updates Business Central inventory based on fulfillment data. This is order-based sync only. Manual Shopify inventory adjustments don't automatically sync to Business Central without custom workflows.
Automate low stock alerts with Shopify Flow or n8n.
For more on automation, see Conditional Logic Automations: When to Use n8n vs Shopify Flow.
Inventory sync between Business Central and Shopify requires careful configuration of stock calculation methods, location mapping, and sync scheduling.
Choose Projected Available Balance for conservative stock levels that prevent overselling. Choose Free Inventory if you use Business Central's reservation system extensively.
Don't mix standard Shopify locations with fulfillment service locations. Choose one fulfillment approach and stick with it.
Sync frequently during peak periods, but balance accuracy with system performance. Hourly syncs work for most B2B businesses.
Monitor sync logs regularly and reconcile inventory monthly to catch discrepancies early.
Get inventory sync right, and you'll avoid overselling, reduce manual inventory updates, and keep customers happy with accurate stock availability.
Related resources:

.png)
